Stephanie Kay Nutrition

Stephanie Kay Nutrition

Real Food for Real Life

  • recipes
    • all recipes
    • Breakfast
    • Lunch
    • Dinner
    • Soups & Stews
    • Salads
    • Sides
    • Snacks
  • nutrition
    • All Articles
    • Tips
    • FAQs
    • This vs. That
    • How To/Guides
    • Weight Loss
  • resources
    • 10 Days of Nutrition
    • 7-Day Meal Plan
    • Balanced Meal Guide
    • 5-Ingredient Cookbook
    • Lunch Box Cookbook
  • About
    • About Steph
    • Contact
  • Dinner
  • Breakfast
  • Meal Prep
  • Nutrition Tips
  • facebook
  • instagram
  • pinterest
  • youtube

Warm Potato Salad with Herbs

Published on September 4, 2017 by Stephanie Kay

This warm potato salad with herbs has a light dressing that is full of flavor, making it a great healthy side dish for lunch and dinner alike.

Warm Potato Salad with Fresh Herbs

Potatoes, talk about a food that has a bad rap! These poor little spuds have been demonized for years, said to be the root cause of weight gain and so much more. The reality is that white potatoes are an incredibly nutritious whole food that has been consumed by many cultures for hundreds of years, so they are nothing to be afraid of. When consumed in appropriate amounts, whole food starches like white potatoes, white rice, corn, and oatmeal are a far superior source of energy to any bread, noodle, or cracker. It is this common type of common food and nutrition misconception that I want to dispel for people because you should never have to worry or fear any whole food that you are eating. The truth is, there are no “good” or “bad” foods, there is only real food, and a bunch of other processed stuff we call food, and if you focus on eating real whole food and cooking from scratch, you will do just fine.

This warm potato salad with fresh herbs is a twist on a classic potato salad; served warm with a much lighter and more flavourful dressing. I used a mixture of fresh herbs including parsley, basil, and chives, but you could use any combination of fresh herbs you like. I think a little touch of dill or mint would work well too.

Print
Warm Potato Salad with Fresh Herbs

Warm Potato Salad with Fresh Herbs

Author: Stephanie Kay

This warm potato salad with fresh herbs can be made with yellow potatoes or baby red or white potatoes. Although meant to be served warm, this salad also keeps very well in the fridge for 3-4 days and taste great as cold leftovers too.

  • Author: Stephanie Kay
  • Prep Time: 10 minutes
  • Cook Time: 20 minutes
  • Total Time: 30 minutes
  • Yield: 6 servings
  • Category: Salads, Sides
  • Cuisine: Vegetarian
  • Diet: Low Calorie
Print Recipe
Pin Recipe

Ingredients

  • 2 pounds yellow potatoes or baby potatoes, skin on
  • 1/4 cup olive oil
  • 1/2 lemon, zested
  • 1 lemon, juiced
  • 2 tablespoons whole-grain mustard
  • 1 clove garlic, minced
  • 1/3 cup flat-leaf parsley, finely chopped
  • 4 sprigs chives, minced (about 1/8 cup)
  • 2 sprigs basil, roughly chopped (about 1/8 cup)
  • 1/2 teaspoon salt
  • 1/4 teaspoon black pepper

Instructions

  1. Wash, rinse, and dry potatoes, and then cut them in half or quarters to create bite-size pieces.
  2. Bring a pot of salted water to a boil, add cut potatoes, and cook for 18-20 minutes the potatoes are tender and can be pierced with a fork.
  3. While the potatoes are boiling, add the olive oil, lemon juice, lemon zest, minced garlic, and grainy mustard to a bowl and whisk until well combined. Set aside.
  4. Once the potatoes are cooked, drain the water, and add then transfer the potatoes to a large bowl.
  5. While the potatoes are still hot, pour the dressing over the potatoes, then toss or stir until all potatoes are well coated in dressing.
  6. Add the fresh herbs, salt, and pepper and toss again. Taste and adjust seasoning as needed.
  7. Serve the warm salad immediately and enjoy!

Nutrition

  • Serving Size: 1 serving
  • Calories: 118 calories
  • Sugar: 2 grams
  • Fat: 10 grams
  • Carbohydrates: 9 grams
  • Fiber: 1 gram
  • Protein: 1 gram

Did you make this recipe?

Share a photo and tag us — we can’t wait to see what you’ve made!


Spice-Rubbed Pork Tenderloin

Published on September 3, 2017 by Stephanie Kay

This spice-rubbed pork tenderloin is a super simple sheet pan dinner that is ready in 30 minutes or less, for a tasty weeknight meal or an easy meal prep idea.

Spice-Rubbed Pork Tenderloin

Sheet pan dinners, or tray bake meals, have become a real trend, and rightfully so. They are simple to make, simple to clean up, and a great way to get a nutritious meal on the table. I personally use sheet pans a lot in my kitchen, be a to roast a batch of veggies, make dinner, or a great way to do a lot of meal prep quickly.

Pork is a really simple protein to cook which is why it is so fun to work with. Pork tenderloin itself it is pretty mild in flavour, so finding a good way to season it is really important. There are lots of fun marinades and sauces you can add to pork to help to intensify the flavour, but I think a simple spice rub works just as well. Plus, it doesn’t take much forward planning; just simply add the spices and away you go.

This spice-rubbed pork tenderloin recipe technically uses two pans, so I am cheating a little bit by calling it a sheet pan meal. Although you can certainly add the seasoned pork directly to the oven to bake, I like to sear it quickly in a pan first to help bring out the flavour of the spices and ensure they adhere well to the pork tenderloin. The spices I used for this Spice-Rubbed Pork Tenderloin are a personal combination I like, but if you prefer a little more heat, just add a little more chilli powder, cayenne or crushed chillies to increase the level of spice.

More Healthy Pork Recipes:

  • Herb-Crusted Pork Tenderloin
  • Pork Souvlaki
  • Spanish Pork Chops
Print
Spice-Rubbed Pork Tenderloin

Spice-Rubbed Pork Tenderloin

Author: Stephanie Kay

This spice-rubbed pork tenderloin call for carrots and green beans, however, you could really use any vegetables you have on hand; asparagus, zucchini, peppers, Brussel sprouts, and broccoli would all work just as well.

  • Author: Stephanie Kay
  • Prep Time: 10 minutes
  • Cook Time: 25 minutes
  • Total Time: 35 minutes
  • Yield: 4 servings
  • Category: Mains
  • Cuisine: Paleo, Gluten-Free, Dairy-Free
  • Diet: Gluten Free
Print Recipe
Pin Recipe

Ingredients

pork:

  • 1lb pork tenderloin
  • 1 teaspoon garlic powder
  • 1 teaspoon dried oregano
  • 1 teaspoon ground cumin
  • 1 teaspoon chilli powder
  • 1 teaspoon smoked paprika
  • 1/2 teaspoon sea salt
  • 1 tablespoon olive oil

sides:

  • 4 cups carrots, peeled
  • 4 cups green beans, trimmed
  • 2 teaspoons olive oil
  • 1/2 teaspoon sea salt

Instructions

  1. Preheat oven to 400°F.
  2. Add peeled carrots and green beans to a bowl, drizzle with olive oil, season with sea salt and toss to ensure the vegetables are well coated. Set aside.
  3. In a small bowl, combine garlic powder, oregano, cumin, chilli powder, paprika and sea salt to create a rub.
  4. Lay pork tenderloin on a cutting board, pat to dry, and rub spice mixture all over. Ensure that all sides and ends are coated with the dry rub.
  5. On a large baking sheet, arrange carrots and greens beans and transfer to the oven for 5 minutes.
  6. While the vegetables are in the oven, heat olive oil in a cast-iron pan or heavy bottom skillet and sear tenderloin on all sides. This should take about 2-3 minutes per side, for a total of 5-6 minutes.
  7. After 5 minutes, remove the vegetables from the oven and nestle the seared pork tenderloin among the vegetables.
  8. Return pork tenderloin and vegetables to the oven for another 15 minutes, until pork reaches an internal temperature of 150°F.
  9. Once cooked, remove from the oven and allow pork to rest for 5-10 minutes before slicing.
  10. Cut pork tenderloin crosswise into ½ inch-thick slices, and serve with roasted vegetables.
  11. Enjoy!

Nutrition

  • Serving Size: 1 serving
  • Calories: 266 calories
  • Sugar: 9 grams
  • Fat: 9 grams
  • Carbohydrates: 21 grams
  • Fiber: 7 grams
  • Protein: 27 grams

Did you make this recipe?

Share a photo and tag us — we can’t wait to see what you’ve made!

Healthy Bread: A Complete Guide

Published on August 31, 2017 by Stephanie Kay

Stopping by the store to buy a loaf of bread used to be a simple task, but with all of the options available today it can feel completely overwhelming. With clever marketing gimmicks and fancy buzzwords it can be difficult to know what to look for, so here is a simple how-to guide to buying healthy bread.

A Guide to Buying Healthy Bread


How to Buy Healthy Bread

When it comes to eating well and making the best choices, the simplest thing to do is focus on eating whole foods in their whole format, or foods that are simply one ingredient. However, because bread is not a whole food (there is no bread tree), it is important to understand how bread is made and the different types available to ensure you are making the best choice. So let’s start with the basics.

White vs. Wheat vs. Whole Wheat

A grain of wheat in its natural form contains three edible parts; the germ, endosperm, and bran. Each layer contains different integral nutritional components of the grain; the germ contains B vitamins, some protein, and minerals; the endosperm contains starchy carbohydrates, proteins, and small amounts of vitamins and minerals; and the bran layer contains antioxidants, B vitamins, and fiber. When a grain of wheat is made into flour it can be done one of two ways; by grinding the whole grain, all parts intact, to make whole wheat flour or by removing the bran and germ to make refined wheat flour. Because the bran and the germ contain most of the integral nutrition components of the whole grain, many of the vitamins, minerals, and phytonutrients are lost in the process of many refined flours. In fact, without the bran and germ, about 25% of a grain’s protein is lost, and at least seventeen key nutrients are greatly reduced. Therefore manufacturers will add back some vitamins and minerals to enrich refined grains, so refined products still contribute valuable nutrients.

However, where a little bit of confusion lies is in the fact that there is a strain of wheat called “white wheat” in which the bran is lighter in color and milder in flavor, and so when the whole grain of “white wheat” is ground into flour it is still considered whole grain flour (because the whole grain was included), although it might be white in color. It might seem a little confusing, but any type of wheat (regular or white) in which the whole grain is made into flour is considered whole grain flour, while if the germ and bran have been removed it is considered refined flour, or enriched flour if nutrients have been added back in.

In addition to wheat flours, there are many other types of flours and processing terms that have become marketing buzzwords, such as multigrain, stone-ground, or gluten-free so let’s have a look at some of the most common to see if they are worth the hype.

Common Bread Buzzwords

  • 100% Wheat: This implies that the bread has been made with only wheat as opposed to another grain, or a combination of grains. However, this does not tell is whether or not the bread was made of whole-grain flour or refined flour.
  • Multigrain: This suggests that the bread was made of flour from multiple types of grains, such as wheat, spelt, rye and/or barley. In addition to multigrain, similar terms might include 7-grain or 12-grain, however, this does also not specify if the flour was whole grain flour or refined flour.
  • Whole Wheat: This suggests that the bread was made of whole grain wheat flour including the germ, endosperm, and bran. This is ideal as it ensures the nutritional components were still intact when the flour was made.
  • Whole Grain: Much like whole wheat, the term whole grain implies that the germ, endosperm, and bran were all present in the flour. The difference is simply that this does not limit the bread to containing wheat, as it can contain any grain flour, or combination of grain flours, including spelt, rye, barley, oats, millet, etc…
  • Ancient Grains: Although there is no official definition of the term ancient grains, it is loosely defined as grains that have been largely unchanged over the last several hundred years or those that Western culture has ignored until recently. These typically include kamut, spelt, buckwheat, sorghum, teff, millet, quinoa, amaranth, and less common strains wheat. A bread made of ancient grains would simply be made of the flours of these grains, however, the term does not specify if the flour was whole grain flour or refined flour.
  • Gluten-Free: Gluten is a protein structure found in certain grains, however, there are many grains that do not contain gluten such as buckwheat, rice, corn, and quinoa, so gluten-free bread is simply made of flour from gluten-free grains.
  • Enriched: This might sound like a good thing, but enriched flours are typically refined flours that have been stripped of their germ and bran and therefore stripped of vital nutrients, phytonutrients, and fibre. Therefore enriched flour is simply refined flour that has had vitamins and minerals added back that were lost during the milling process.
  • Stone-Ground: This is in reference to how the grain itself was milled into flour. The term stone-ground indicates that the grain was intact when it was turned into flour (whole grain), as some commercial whole grain flours are made by separating the parts of the grain and putting them back together, which is less than ideal.
  • Sprouted Grain: This refers to the way the grains were prepared before the flour and bread were made. Sprouted bread is made from whole grains that have been allowed to sprout (or germinate), before being milled into flour. Sprouted grains are by necessity whole grains since you can not sprout refined flour. The sprouting process helps to eliminate anti-nutrients and makes the grains more easily digested when consumed.

Not All Bread is Created Equal

As with any food, the ingredients a food contains have a huge impact on its nutritional value, however so does the way a food is prepared. Consider a simple example; a white potato can be made into both a baked potato or deep fried in vegetable oil to make chips. Although these foods are made of the same ingredient, potato, they are not nutritionally equivalent. So, it is important to note that there is a difference between real bread and common refined grocery store bread.

Technically speaking, the only ingredients required to make bread are flour, water, and salt. Contrary to popular belief, yeast is not a necessary ingredient for bread making. In the traditional bread-making process, flour and water are combined to create a ‘starter’ that reacts with wild yeast and lactobacilli bacteria present in the air, which is left to slowly ferment, which helps the bread to rise before being transferred to an oven to bake. This process is referred to as sourdough bread. The benefit to this method is that the sourdough starter produces lactic acid which helps to naturally ferment the dough, the same way bacteria ferments yogurt, sauerkraut, pickles, kimchi, and other fermented foods, which is said to “pre-digest” the grains, remove anti-nutrients, increases the content of beneficial bacteria in the flour, and therefore helps to make the bread more easily digested. However, because the process of making sourdough bread can take several days, today, most commercial bread is made with domesticated active-dry yeast or baker’s yeast. Doing so helps to speed up production time, which is simpler for commercial use and mass production, and easier for bakers to use and store, however in doing so the natural fermentation and the leavening process does not allow for the same health benefits.

Healthy Bread: Things to Avoid

When it comes to grocery store bread, it is important to look away from the buzzword-covered labels and focus on the ingredients list to ensure you are buying the best quality bread you can. Many common brands will include unnecessary ingredients that can easily be avoided.

  • Refined Flours: Opt for whole-grain flours over enriched or bleached flours to ensure you are getting the most naturally occurring and nutritious version of flour.
  • Sugar: Unless you are buying a sweet loaf (i.e. – cinnamon raisin), there is no need for sugar or sweeteners in bread as naturally leavened bread does not require sugar to rise. If you are buying bread made of commercial yeast, some bread will contain a small amount of sugar, which helps to activate the yeast, so simply ensure the label contains less than 1 gram of sugar per serving.
  • Vegetable Oils: There is no need for the inclusion of oils of any kind in bread, so it is best to avoid them altogether. Some brands will use vegetable oil on their equipment during the bread-making process, which is sometimes indicated on the label, however, this negligible amount would be acceptable.
  • Sodium: Salt is an important ingredient in the sourdough bread-making process, however, there is no need for an excessive amount of sodium. Anything under 200mg of sodium per serving would be ideal.
  • Preservatives: You should be able to pronounce all of the ingredients in your bread. Although this might sound difficult to do with grocery store brands, it is possible, it might just take a little extra time spent reading labels in the bread aisle.

Healthy Bread: The Best Bread Options

Although it might seem more than impossible to find healthy bread options, I can assure you it is fully possible. When it comes to the best options, here is a simple guide to buying healthy bread:

1. Sourdough Bread

Sourdough bread will always be the very best option as it ensures the bread was made with whole grains, and wild yeast and was naturally leavened. This ensures that the bread contains all of the nutritional benefits of the grain and is naturally fermented making the bread more easily digested by the body. Finding true sourdough bread is easiest done by visiting a local farmers market or bakery, just be sure to ask the baker if you are unsure. Some grocery stores might carry sourdough bread, but be sure to read the ingredients list and ensure is made with flour, water, and a sourdough starter or sourdough culture or cultured flour starter, as the ingredients should not contain yeast in true sourdough.

2. Sprouted Grain Bread

Sprouted grain bread would be the next best option to sourdough, and they are more easily found in health food and grocery stores. Look for an ingredient list with minimal ingredients including sprouted grains (multiple types of grains is fine), bacterial culture or yeast, water, and salt. In some cases, these bread are kept in the freezer sections of grocery stores to ensure they don’t go off too quickly (they don’t contain preservatives after all), and some of the best common brands include Silver Hills Bakery and Ezekiel Bread.

3. Whole Grain Bread

If sourdough or sprouted grain bread is not available to you, at the very least ensure that you are choosing whole grain bread. This can be wheat bread, multigrain bread, or ancient grain bread, just ensure that whole grain flour was used to make the bread. Be sure to read the label to make sure the bread does not contain any added sugars, oils, or excess sodium, however, the inclusion of any nuts or seeds would be just fine.

Tex-Mex Breakfast Bowls

Published on August 29, 2017 by Stephanie Kay

These Tex-Mex-inspired scrambled egg breakfast bowls with sweet potatoes are a great way to use last night’s leftovers for breakfast or can easily be made in under 30 minutes for a hearty weekend brunch.

Tex-Mex Breakfast Bowls

One-bowl meals are my favourite way to eat any meal of the day; throw everything in a bowl, let the flavours blend together and eat it all up. If you follow me on Instagram you’ll notice that a lot of my lunches work like this, I wouldn’t quite consider them a salad or a stir-fry, but rather some form of salad-fry (is that a thing?) where I combine cold and hot ingredients with whatever I might have on hand, which is exactly how I created these Tex-Mex breakfast bowls.

Although sweet options are a more common breakfast concept for many, savoury is really the way I like to go, so I forgo the fruit and load my breakfast up with veggies and greens to help add more servings to my day. I’ve been eating savoury breakfast bowls for a long time now, in fact, my green breakfast bowl was one of the first recipes I shared on my blog. Although I’m more a fly-by-the-seat-of-my-pants kind of gal when it comes to breakfast, these Tex-Mex breakfast bowls are a great combination of flavours and worth a little forward planning.

Tex-Mex Breakfast Bowls

With its combination of eggs, sweet potatoes, veggies and avocado, these Tex-Mex breakfast bowls are loaded with protein, complex carbohydrates and healthy fats, making it a perfectly well-balanced meal. This recipe serves two people, however, it would also serve as a great make-ahead breakfast idea for weekday mornings; simply roast the veggies and potatoes ahead of time and quickly cook an egg for a tasty morning meal. Plus, these Tex-Mex breakfast bowls would also make a great brunch idea for a large group, just lay the ingredients out on the table to create a fun build-your-own breakfast bowl buffet!

More Healthy Breakfast Bowls:

  • Meal Prep Breakfast Bowls
  • Green Breakfast Bowls
  • Savory Oatmeal Bowls
  • Italian Breakfast Bowls
  • Cinnamon Quinoa Breakfast Bowls
  • Middle Eastern Breakfast Bowl
Print
Tex-Mex Breakfast Bowls

Tex-Mex Breakfast Bowls

Author: Stephanie Kay

These breakfast bowls call for sweet potatoes, but white potatoes would work just as well, you will just want to add another 5-10 minutes to the cooking time. And if you are not a fan of scrambled eggs, poached or fried would be delicious too!

  • Author: Stephanie Kay
  • Prep Time: 15 minutes
  • Cook Time: 25 minutes
  • Total Time: 40 minutes
  • Yield: 2 bowls
  • Category: Breakfast
  • Cuisine: Mexican
  • Diet: Vegetarian
Print Recipe
Pin Recipe

Ingredients

  • 1 large sweet potatoes (or 2 small), skin on, diced
  • 1/2 red onion, cubed
  • 1 red bell pepper, cubed
  • 1 green bell pepper, cubed
  • 1 teaspoon olive oil
  • 1/2 teaspoon chili powder
  • 1/4 teaspoon smoked paprika
  • 1/4 teaspoon ground cumin
  • 1/4 teaspoon garlic powder
  • 1/4 teaspoon sea salt + more for seasoning
  • Black pepper, for seasoning
  • 4 eggs
  • 1 teaspoon butter
  • 8 cherry tomatoes, halved
  • 1/2 avocado, sliced
  • Cilantro, roughly chopped, to serve
  • Hot sauce, to serve (optional)

Instructions

  1. Preheat oven to 400°F.
  2. In a small bowl, combine the spices; chili powder, paprika, cumin, garlic powder and sea salt. Set aside.
  3. In a large bowl, add diced sweet potato, drizzle with 1 tsp. of olive oil and season with a pinch of sea salt. Toss to ensure that the potatoes are well coated in oil and transfer them to a large baking sheet.
  4. In the same bowl, combine onion, red bell pepper, and green bell pepper, drizzle with olive oil and cover with spice mixture. Toss well to ensure that all of the vegetables are coated in oil and spices and transfer them to the baking sheet with the sweet potato.
  5. Transfer the baking sheet to the oven and roast for 25 minutes until the potatoes are cooked through and can easily be pierced with a fork.
  6. While the vegetables are roasting, scramble the eggs. In a small bowl, crack eggs, season with a pinch of salt and pepper, beat with a fork until well combined.
  7. Heat a pan to medium-high and add butter to the pan. Once the butter is melted, add the whisked eggs to the pan.
  8. Using a wooden spoon or spatula, stir eggs slowly, bringing eggs in from the edges of the pan to the centre. Continue to do so until eggs are cooked through, silky and smooth.
  9. Once the vegetables are cooked, begin to assemble the breakfast bowls.
  10. Split the roasted sweet potatoes, roasted vegetables, and eggs between bowls. Top each bowl with 1/4 avocado, 4 cherry tomatoes and a sprinkle of fresh coriander.

Nutrition

  • Serving Size: 1 bowl
  • Calories: 403 calories
  • Sugar: 26 grams
  • Fat: 25 grams
  • Carbohydrates: 55 grams
  • Fiber: 17 grams
  • Protein: 22 grams

Did you make this recipe?

Share a photo and tag us — we can’t wait to see what you’ve made!

Arugula, Watermelon & Feta Salad

Published on August 27, 2017 by Stephanie Kay

If you thought watermelon was only for sweet dishes and desserts, think again! Not only does it pair incredibly well with savoury foods, but it’s an incredibly hydrating fruit that is packed full of water, making it a refreshing addition to this arugula, watermelon, and feta salad, and perfect for a hot summer day.

Arugula, Watermelon and Feta Salad


I think watermelon is a lot like corn in the sense that it is truly best eaten as is; directly off the rind or the cob. There is nothing quite as refreshing (and messy) as biting into a big slice of watermelon on a hot summer’s day, and although I truly think that is the best way to eat it, there is something fun about getting creative in the kitchen with seasonal vegetables.  So, once I used corn to create my Mexican street corn salad, I figured there must be a fun way to use watermelon too.

Since watermelon is only really around during the summer months, this salad is best made for a backyard BBQ or party.  It can be made ahead of time, just be sure not to dress the salad until the moment you are about to eat as the arugula will wilt quickly. Arugula is a really peppery leafy green so I love using it in a salad with lighter and sweeter flavors. I think the combination of spiciness, sweetness, and saltiness in this salad makes for a really delicious bite.


Print

Arugula, Watermelon and Feta Salad

Arugula, Watermelon and Feta Salad

Author: Stephanie Kay

This arugula, watermelon and feta salad is quick and easy to toss together and a great side dish for anything on the grill.

  • Author: Stephanie Kay
  • Prep Time: 15 minutes
  • Total Time: 15 minutes
  • Yield: 4 servings
  • Category: Salads
  • Cuisine: Vegetarian, Gluten-Free
  • Diet: Low Calorie
Print Recipe
Pin Recipe

Ingredients

Salad Ingredients:

  • 6 cups arugula, well packed
  • 2 cups watermelon, diced into 1/2″ cubes
  • 1/2 cup crumbled feta
  • 1/2 cup mint leaves, thinly sliced

Dressing Ingredients:

  • 1/4 cup olive oil
  • 1 shallot, minced
  • 2 tablespoon red wine vinegar
  • 1 teaspoon Dijon mustard
  • 1/4 teaspoon sea salt
  • 1/8 teaspoon black pepper

Instructions

  1. Assemble the salad; in a large bowl combine arugula, watermelon, feta, and mint.
  2. In a small bowl or jar prepare the dressing. Combine all ingredients and whisk together until well combined.
  3. When you are ready to serve, drizzle salad with dressing and toss to combine.
  4. Season with salt and pepper to taste (as needed) and serve immediately.
  5. Enjoy!

Nutrition

  • Serving Size: 1 serving
  • Calories: 205 calories
  • Sugar: 6 grams
  • Fat: 18 grams
  • Carbohydrates: 8 grams
  • Fiber: 1 gram
  • Protein: 4 grams

Did you make this recipe?

Share a photo and tag us — we can’t wait to see what you’ve made!

10 “Bad” Foods that are Good for You

Published on August 24, 2017 by Stephanie Kay

People love to give food labels; this is “good”, that is “bad”, this is “healthy” and that is “unhealthy”. Although that seems like such an easy way to explain nutrition, people have gotten things oh-so-confused, so allow me to elaborate and explain the top 10 “bad” foods that are good for you.

10 “Bad” Foods that are Actually Healthy

Table of contents

  • List of “Bad” Foods that are Healthy
  • 1. White Potatoes
  • 2. Butter
  • 3. Egg Yolks
  • 4. White Rice
  • 5. Bananas
  • 6. Coffee
  • 7. Fatty Cuts of Meat
  • 8. Popcorn
  • 9. Salt
  • 10. Cheese

I have written a lot about “good” foods, and “bad” foods in my recent posts. I’ve talked about how there actually are no “good” or “bad” foods, there is only real food and a bunch of other processed stuff we call food. In the buzzing nutrition climate of 2017 it is really easy to get swept up in trends, fads, and misinformation, however, getting back to basics is the easiest way to settle some of these complicated nutrition debates. When it comes to determining if a food is healthy or not, the simplest thing to ask yourself is “Is it real food?”. Although that might seem like an incredibly silly question, it is surprising how quickly people forget to look at the basics because we have been taught to think that nutrition is a complicated beast that we can’t figure out on our own. Due to this misinformation, we have ignored traditional cultures and allowed ourselves to be marketed silver bullet solutions and ‘health foods’ that no longer resemble real food at all. 

List of “Bad” Foods that are Healthy

So, let’s ignore the fad diets, let go of the guilt, go back to basics, focus on whole foods, and discover why those confused “bad” foods are good for you after all.

1. White Potatoes

White potatoes are considered comfort food and they most certainly are, however that does not make them bad for you. Think about it for a second; potatoes are grown in the dirt and come from the ground, just like carrots, beets, and parsnips. White potatoes have been used by various cultures for generations, in fact, many evolved to eat potatoes, so to consider them unhealthy seems absurd. The truth is, a potato is an exceptionally healthful food that can serve as a great source of complex carbohydrates, fiber, and antioxidants. In fact, given potatoes have very small levels of phytic acid they are an ideal source of carbohydrates as compared to some grains and legumes which contain higher levels of phytic acid, which can reduce the digestibility of foods. Of course, the cooking method will impact the nutrition of potatoes, so opt for baked, mashed, or roasted, and leave the deep-fried versions for once in a while.

2. Butter

Butter is the poster child for “unhealthy” foods, blamed for everything from heart disease to high cholesterol, however, butter has received a reputation that it does not deserve. Yes, butter might be high in saturated fat and cholesterol, but that is actually a good thing. Butter contains saturated fats, including short and medium-chained fatty acids that are beneficial for energy, metabolism, and cholesterol that can serve as a potent antioxidant. Butter also contains a good balance of essential fatty acids, containing more omega-3 than omega-6 fatty acids (from pastured grass-fed cows), which is ideal as excess omega-6 fatty acids (found in vegetable oils) can increase inflammation in the body. Given butter is a source of natural fatty acids, it also contains fat-soluble vitamins such as vitamins A, D, E, and K which are essential for health, as well as lecithin which assists in the proper assimilation and metabolism of cholesterol. So forgo the vegetable oils, skip the margarine, and spread your butter the way grandma used to.

3. Egg Yolks

Demonized by the persistent myth that dietary cholesterol should be avoided, egg yolks have been given a bad rap since the 1970s. For years we have been told to discard the yolks and opt for egg white omelets as a “healthier” choice. However, the reality is that by discarding the yolk, you are robbing yourself of the most nutrient-dense part of this incredible food. In fact, there is little evidence that links egg yolks to heart disease, and if anything, they likely help to protect against it. One egg provides 13 essential nutrients, all present in the yolk, and a whole egg is a rich source of protein, providing a complete range of amino acids, omega-3 fatty acids, B vitamins, vitamin D, vitamin A, selenium, and magnesium. Additionally, all of the fat-soluble vitamins, as well as 100% of the omega-3 fatty acids are present in the yolks, making it the most nutrient-dense part of the egg. So get cracking, because the truth is, 3 eggs a day might just keep the doctor away.

4. White Rice

Contrary to popular belief, much like white potatoes, white rice is not bad for you. White rice is often called out for its high glycemic index, as compared to brown rice which is said to contain more nutrients and fiber, however, white rice is not half as bad as it is made out to be. All white rice starts out as brown rice, and a milling process helps to remove the rice’s bran and germ. Although this might seem less than ideal at first glance, the bran and germ are difficult to break down for some people, as they contain many anti-nutrients and gut irritants that make it difficult to digest. Therefore, for much white rice is much more easily digested and absorbed than brown rice, and can serve as a great source of energy. So it is no wonder why Asian cultures have been consuming white rice for generations, as it is a perfectly acceptable food to include in a healthy diet. When opting for white rice, be sure to choose the most unprocessed versions available; basmati, jasmine, short-grain, or long-grain are ideal.

5. Bananas

Believe it or not, bananas (and fruit in general) have gotten a bad rap in recent years for their high sugar content. Although they might have a higher sugar content than some fruit that does not make them a poor choice, and there are in fact many other fruits with a higher sugar content and a higher glycemic index than bananas. To provide some context, suggesting bananas are unhealthy would be like suggesting you should avoid Brussels sprouts because they have a higher glycemic index than broccoli, it’s not worth the battle. When it comes to whole foods it is important to keep some perspective and a banana is likely not going to cause any harm. Plus, bananas are widely accessible and inexpensive, and they also pack a powerful health punch; well known as being a rich source of potassium, they also contain fiber, vitamin C, vitamin B6, manganese, biotin, and copper. When it comes to fruit, it is best to consume a wide variety and focus on local seasonal fruit as much as possible.

6. Coffee

It might not technically be food, but it certainly needs to be included on the list. Yes, coffee contains caffeine but in reasonable amounts coffee has been shown to have many health benefits, including antioxidants. However, in excess, even a good thing can be bad for you, so simply be mindful of the amount of caffeine you consume. Although coffee might contain antioxidants, we know that’s not why most people drink it, and relying on coffee as a stimulant to get you through your day is a less-than-ideal choice. So if you chose to drink coffee it is best to limit to one cup per day, forgo the heavily sweetened versions, and opt for it either black or with a splash of milk or heavy cream.

7. Fatty Cuts of Meat

There remains an idea that healthy meat is lean meat, and that fatty meat is unhealthy, but the reality is that they can both be good for you. For many years, we have been told to focus on muscle meats like chicken breasts and lean cuts of beef, however avoiding the odd cuts of meat is completely unnecessary. Chicken legs, thighs, wings, and even skin are whole foods that can be incorporated into a healthy diet, as well as rich cuts of beef such as brisket, shanks and ribs, pork shoulder, and even bacon. Think about it, traditional cultures did not have the option to pick and chose what cuts of meat they wanted to eat, they simply used the whole animal, bones and all. The benefit of these richer sources of meat is that they contain higher amounts of fat-soluble vitamins A, D, E, and K2, as well as glycine (from the skin, bones, cartilage, etc) that we don’t get in isolated lean cuts of meat.  When it comes to fatty cuts of meat the one thing to consider is the quality of the meat you are consuming, as conventional sources might not contain a well-balanced omega 3 to 6 ratio, so opt for local, pastured, or grass-fed animals when possible. Aim to eat nose-to-tail, there is no need to limit yourself to the leaner cuts.

8. Popcorn

Ok, let’s get clear, I’m not talking about the movie theatre stuff! Popcorn, the real deal, is made by heating whole corn kernels in a natural cooking fat over heat, so when well prepared it can be a great healthy snack. Corn itself is a whole grain, which is fairly low in phytic acid, and when eaten with butter it can actually help to mitigate its effects. The most concerning part of conventional popcorn is the oil used to cook the corn and the excess amount of salt added, so although microwavable bags are handy and convenient, the added vegetable oils and salts make it a less-than-ideal choice.  Instead, pop whole kernels at home on the stove top in butter, coconut, oil, or ghee and season with sea salt and spices to your own liking for a fun and healthy snack.

9. Salt

If you are eating a diet rich in processed foods you should most certainly be concerned with the added refined sodium content of your meals, however, if you are eating a diet rich in whole foods salt has many beneficial functions in the body. Salt is important for balancing the fluid level of the blood, managing the body’s acid-alkaline balance, functions of the nervous system, adrenal function, stomach acid production, and proper nutrient absorption in the intestinal tract. Sodium is one of the electrolytes, along with potassium and chloride, that helps to regulate the body’s movement of water as it is a major component of the extracellular fluid.  But remember, not all salts are created equal, so it is important to opt for natural sea salt over table salt to ensure you are getting the least refined format possible.

10. Cheese

The concept that fat makes you fat is old news that needs to go. Real cheese is made of whole milk with no additives and can be a healthy addition to a diet. When produced from whole milk from grass-fed cows, real cheese contains a surprising array of nutrients including omega-3 fats, vitamin E and CLA, and serves as a healthy source of fat in small amounts. However not all cheeses are created equal, so it is best to avoid processed cheeses, cheese slices, cheese spreads, or low-fat cheeses. Cheeses made of unpasteurized milk from pastured animals are ideal, and if you are unsure of what to buy, simply read the ingredients labels of your favorite grocery store cheese, as you might be surprised at what you see. For those who struggle with cow’s milk, sheep’s milk and goat’s milk are often more easily digested for many. However, keep in mind that although cheese might be considered a healthy real food, dairy does not necessarily agree with everyone, so always pay attention to your body’s personal cues.

Grilled Jamaican Jerk Chicken

Published on August 22, 2017 by Stephanie Kay

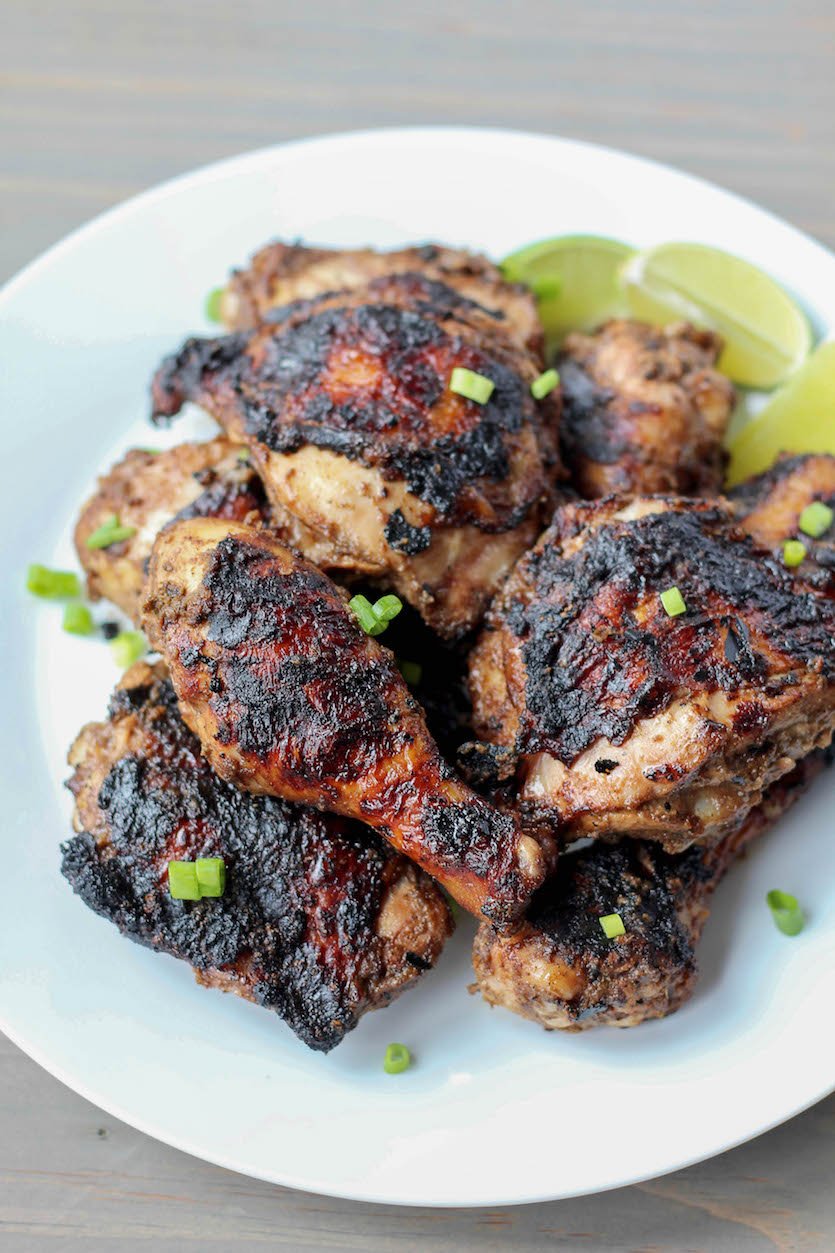
This grilled Jamaican jerk chicken recipe is fiery, smoky, hot, and incredibly fragrant, and a simple take on a classic Jamaican dish.

Grilled Jamaican Jerk Chicken


Ok, so I can’t promise that this is 100% authentic Grandma-style jerk chicken, but I still think it is pretty darn tasty! I grew up in a tiny town of 5,000 people in eastern Quebec, so the Caribbean, let alone international, the cuisine was not aplenty when I was a kid. It was not until I went away to university that I really began to open my culinary palette trying everything from Greek to Thai to Indian and Caribbean food. To this day I still remember my first time visiting a Caribbean restaurant and eating jerk chicken. I had (clearly) never tried it before but it was love at first bite; the blend of fragrant, fiery, and smoky flavors made me an instant fan of jerk chicken.

The term jerk refers to a spice rub made of two primary ingredients; allspice berries and scotch bonnet peppers. Jerk is a dish that is common in many areas of the Caribbean but is best known for its roots in Jamaican cuisine. Classic jerk chicken is grilled over pimento wood, which comes from the tree that also produces allspice berries, and calls for bone-in, skin-on cuts of chicken as they provide the deepest and richest flavors.

Contrary to popular belief, these fattier and richer cuts of meat are actually incredibly nutritious, not to be feared, and should be eaten more frequently. Cuts such as legs, thighs, and wings, are rich in fat-soluble vitamins, more nutrient-dense than the leaner chicken breast, and arguably better tasting too.


Grilled Jamaican Jerk Chicken


More Healthy Grilled Chicken Recipes:

  • Grilled Cilantro Lime Chicken
  • Grilled Italian Chicken Brochettes
  • Kale Pesto Grilled Chicken


Print

Grilled Jamaican Jerk Chicken

Grilled Jamaican Jerk Chicken

Author: Stephanie Kay

This grilled Jamaican jerk chicken recipe calls for bone-in, skin-on chicken thighs, and drumsticks, but full legs would work just as well.

  • Author: Stephanie Kay
  • Prep Time: 2 hours
  • Cook Time: 30 minutes
  • Total Time: 2 hours 30 minutes
  • Yield: 8 servings
  • Category: Mains
  • Method: Grill
  • Cuisine: Jamaican
Print Recipe
Pin Recipe

Ingredients

  • 8 pieces skin-on, bone-in, chicken thighs and drumsticks (about 2.5lbs)
  • 1 small onion, roughly chopped
  • 2 scallions, ends removed and roughly chopped
  • 2 cloves garlic
  • 1-2 scotch bonnets or habanero peppers*, stem and seeds removed
  • 1 1/2 teaspoon allspice, ground
  • 1/2 tablespoon dried thyme
  • 1 teaspoon ground cinnamon
  • 1/2 teaspoon ground nutmeg
  • 1/4 teaspoon ground cloves
  • 1 teaspoon black pepper
  • 1/2 teaspoon sea salt
  • 3 tablespoon soy sauce
  • 1 lime, juiced
  • Olive oil, for the grill
  • Scallions and limes to serve

Instructions

  1. Combine all of the ingredients (except the chicken) in a blender or food processor and blend on high until a thick marinade forms.
  2. Place chicken pieces into a large bowl or plastic bag, cover with marinade and place in the fridge for a minimum of 1-2 hours, preferably overnight. (The longer you leave the chicken to marinade, the more it will take on the flavours.)
  3. When you are ready to cook, take the chicken out of the fridge at least 30 minutes before cooking. (Bringing it to room temperature helps for an even cooking process.)
  4. Preheat a grill to medium-high heat, and lightly brush with oil to help chicken from sticking to the grill.
  5. Place the chicken, skin-side down, on the grill over a medium heat and cook for 25 to 35 minutes, turning often, until cooked through (internal temperature of 165°F).
  6. Transfer chicken to a plate and allow to rest 10 minutes before serving.
  7. Dress chicken with scallions and extra lime wedges to serve.
  8. Enjoy!

Notes

*Scotch bonnet peppers are incredibly hot, so handle them with care, and be sure to wash your hands after working with them.

Nutrition

  • Serving Size: 1 serving
  • Calories: 304 calories
  • Sugar: 2 grams
  • Fat: 21 grams
  • Carbohydrates: 6 grams
  • Fiber: 1 gram
  • Protein: 25 grams

Did you make this recipe?

Share a photo and tag us — we can’t wait to see what you’ve made!

Blueberry Avocado Smoothie

Published on August 20, 2017 by Stephanie Kay

Made with ripe avocado and frozen blueberries, this blueberry avocado smoothie is rich, creamy, and filling, making it the perfect snack to keep you going for your day.

Blueberry Avocado Smoothie


Smoothies are perfect for a quick snack or on-the-go breakfast, and this blueberry is an incredibly filling one! Although smoothies can sometimes seem light and unsatisfying, when made with protein, fiber, and healthy fats, they can become an incredibly satisfying meal. This blueberry avocado smoothie is packed full of fruit, healthy fats, and a punch of protein to create a well-balanced meal that will keep you fueled for hours to come.

Not only are they easy to transport, but they are quick to prepare and can actually be made ahead of time if needed. When it comes to making smoothies, one of the most common mistakes people make is forgetting to add fat to their smoothies. That is not to say a fruit-filled smoothie is not a healthy choice, but drinking all of those natural sugars will end up giving you a quick hit of energy by spiking your blood sugar, leaving you hangry shortly thereafter. If you want to ensure you are making the most of your smoothie, it is best to add a source of fat to help keep you satiated and slow the absorption of sugar into the bloodstream. Nuts and seeds are a great way to add fat to a smoothie, however, I often like to add avocado; with its rich texture, it provides a creamy consistency to any shake.

This blueberry avocado smoothie works equally well with fresh or frozen blueberries and serves as a great mid-morning or afternoon snack. If you want to use this smoothie as a breakfast, be sure to add a little extra protein so you can master your morning smoothie to keep you going all day long.

More Healthy Smoothie Recipes:

  • Raspberry Lime Smoothie
  • Peaches & Cream Smoothie 
  • Pineapple & Mint Smoothie


Print

Blueberry Avocado Smoothie

Blueberry Avocado Smoothie

Author: Stephanie Kay

Feel free to use fresh or frozen blueberries in this blueberry avocado smoothie recipe, both will work equally well.

  • Author: Stephanie Kay
  • Prep Time: 5 minutes
  • Total Time: 5 minutes
  • Yield: 2 smoothies
  • Category: Smoothie
  • Method: Blender
  • Diet: Vegetarian
Print Recipe
Pin Recipe

Ingredients

  • 1 avocado
  • 1 1/2 cups blueberries, fresh or frozen
  • 1 banana
  • 1 teaspoon ground cinnamon
  • 1 cup spinach, fresh (optional)
  • 1 teaspoon ground flax (optional)
  • 1 cup ice cubes
  • 2 cups almond milk (or milk of your choice)

Instructions

  1. In a blender, combine all ingredients and blend until smooth.
  2. Depending on the size of your avocado, the smoothie might be a little thick, so just add some extra milk to help thin it out as needed.
  3. Pour into glasses and serve.
  4. Enjoy!

Nutrition

  • Serving Size: 1 smoothie
  • Calories: 363 calories
  • Sugar: 19 grams
  • Fat: 22 grams
  • Carbohydrates: 43 grams
  • Fiber: 14 grams
  • Protein: 6 grams

Did you make this recipe?

Share a photo and tag us — we can’t wait to see what you’ve made!

Summer Squash & Herb Frittata

Published on August 17, 2017 by Stephanie Kay

Combine your favourite summer vegetables with fresh herbs and creamy goat cheese for this super simple summer squash and herb Frittata.

Summer Squash & Herb Frittata


I think a frittata is a simple cooking skill that everyone should master; they are inexpensive, quick-cooking and incredibly versatile making them a great breakfast, lunch or dinner whenever you are in a pinch. By simply combining eggs with vegetables, herbs, meats, cheese or potatoes you can create a culinary masterpiece with very little effort, and a well-balanced meal with lots of protein, carbohydrates and healthy fats, and, if you ask me, this summer squash and herb frittata is a delicious way to do it!

If you’ve never made one, a frittata is an Italian egg-based dish, similar to an omelette or crustless quiche, and although they might seem difficult to prepare, they are actually incredibly simple to make. You don’t need to be an expert in the kitchen because just a few basic tips can help you create a perfect frittata every time:


  • An oven-proof skillet is key to a well-cooked frittata. You want to start the cooking process on the stovetop, but transferring it to the oven to bake helps ensure an even cooking process.


  • Beat the eggs only enough to blend the yolks and whites; overbeating will cause the frittata to proof in the oven and fall into a denser cake-like texture when cooked.


  • Add flavour to your frittata with lots of fresh herbs, spices, and cheeses, and be sure to season generously with sea salt and pepper.


  • Be sure to pre-cook any vegetables you add, as adding them raw will not allow them to soften entirely during the cooking process and lead to a crunchy frittata.


  • Frittatas can be made to serve or made ahead of time, and some might argue they taste better when made in advance.


Zucchini & Herb Frittata

One frittata makes plenty for four to six people with a side dish, and more than enough for two. This zucchini and herb frittata is a delicious lunch paired with a simple side salad, or make one ahead of time for quick and easy grab-and-go breakfasts every morning.

More Frittata Recipes:

  • Sweet Potato and Sausage Frittata
  • Ham and Cheese Frittata


Print
Summer Squash & Herb Frittata

Summer Squash & Herb Frittata

Author: Stephanie Kay

Made with zucchini, fresh herbs and creamy goat cheese, this summer squash and herb frittata works equally well a healthy breakfast or simple dinner.

  • Author: Stephanie Kay
  • Prep Time: 10 minutes
  • Cook Time: 35 minutes
  • Total Time: 45 minutes
  • Yield: 6 slices
  • Category: Breakfast
  • Method: Stovetop & Baked
  • Cuisine: Italian
Print Recipe
Pin Recipe

Ingredients

  • 2 medium zucchini, grated
  • 1 tablespoon olive oil
  • 1 small yellow onion, diced
  • 2 garlic cloves, minced
  • Sea salt
  • Black pepper
  • 1 tablespoon butter
  • 12 large eggs, beaten to blend
  • 1/3 cup soft goat cheese
  • 1/2 cup (packed) mixed fresh tender herbs (chives, basil, parsley or tarragon)

Instructions

  1. Preheat oven to 350°F.
  2. Remove ends from zucchini and use a cheese grater to grate zucchini into small pieces.
  3. In a bowl or strainer, use your hands to squeeze excess liquid out of zucchini (this is key to avoiding a soggy frittata).
  4. Heat olive oil in a cast-iron skillet or oven-proof skillet over medium-high heat.
  5. Add onion and garlic, season with salt and pepper, and cook, stirring occasionally until onion is softened, 3-4 minutes.
  6. Add zucchini to the skillet and season with another pinch of salt and pepper. Cook until zucchini is cooked through and beginning to brown, about 3-4 minutes.
  7. Reduce heat to medium-low and stir in butter until melted.
  8. In a large bowl, crack and whisk eggs, season with salt and pepper, and stir in herbs.
  9. Pour egg and herb mixture into the skillet with zucchini.
  10. Cook, gently stirring egg mixture frequently until edges are slightly set, about 5 minutes.
  11. Add dollops of soft goat cheese to the pan, as evenly distributed as possible. (You want cheese in every slice!)
  12. Transfer skillet to the oven and bake until puffed slightly and the centre is set, about 12–15 minutes.
  13. Remove frittata from the oven and allow to cool in pan at least 5 minutes before serving.
  14. Enjoy!

Nutrition

  • Serving Size: 1 slice
  • Calories: 269 calories
  • Sugar: 1 gram
  • Fat: 20 grams
  • Carbohydrates: 2 grams
  • Fiber: 0 grams
  • Protein: 19 grams

Did you make this recipe?

Share a photo and tag us — we can’t wait to see what you’ve made!


Carrot Cake Breakfast Cookies

Published on August 14, 2017 by Stephanie Kay

These carrot cake breakfast cookies are a handheld version of a warm bowl of oatmeal, with the flavor of carrot cake, and a deliciously healthy way to start the day.

Carrot Cake Breakfast Cookies

As a nutritionist, you wouldn’t necessarily expect me to suggest cookies for breakfast, but here I am doing exactly that and I’m pretty darn happy about it! In the nutrition world, too often people use blanket, black-and-white statements to help guide people on what to eat. “This is good, that is bad, don’t eat that, eat more of this.” Although in theory that is a really great way to help teach people what to eat, it doesn’t leave much room for error and is a little too general for my liking. Fortunately, when created with care, there is nothing unhealthy about breakfast cookies at all.

When it comes to determining if a food item or a recipe is good for you, it simply comes down to the sum of its parts. For instance, if a recipe calls for 1 cup of butter, at first glance that might seem like a lot of butter, but if it makes 24 servings, you’re actually only eating 2 teaspoons of butter per serving, which is a completely reasonable amount.

For these carrot cake breakfast cookies, I wanted to create a (healthy) cookie that could really serve as a quick and easy grab-and-go breakfast option that would actually fill you up and keep you going until lunch. So although these carrot cake breakfast cookies might seem large in size, they were actually created to replace an entire bowl of oatmeal, and when you break it all down, these cookies would create a perfectly balanced breakfast.

Oatmeal Breakfast Cookies with Carrots

Based on this recipe, 1 serving of carrot cake breakfast cookies = 1/3 cup rolled oats + 2.5 tbsp. walnuts + 2.5 tbsp. shredded carrot + 1.5 tbsp. raisins + 1.5 tbsp. apple sauce +1 tsp. coconut oil or butter +1 tsp. maple syrup. All of which seem like completely reasonable amounts to me. So, serving per serving, these carrot cake breakfast cookies are an incredibly well-balanced meal, made with whole foods, and naturally sweetened, to create a sweet, soft, and crunchy on-the-go breakfast.

Plus, if you like this recipe, you should also check out my zucchini breakfast cookies.

More Carrot Cake-Inspired Recipes:

  • Carrot Cake Pancakes
  • Carrot Cake Baked Oatmeal
  • Carrot Cake Overnight Oats
  • Carrot Cake Energy Bites
Print
Breakfast Cookies

Carrot Cake Breakfast Cookies

Author: Stephanie Kay

Made with rolled oats, walnuts, cinnamon, carrots and raisins, these oatmeal breakfast cookies taste just like a slice of carrot cake!

  • Author: Stephanie Kay
  • Prep Time: 10 minutes
  • Cook Time: 25 minutes
  • Total Time: 35 minutes
  • Yield: 6 cookies
  • Category: Breakfast
  • Method: Baked
  • Cuisine: American
  • Diet: Gluten Free
Print Recipe
Pin Recipe

Ingredients

  • 3/4 cup rolled oats
  • 1 1/4 cup oat flour*
  • 1 cup chopped walnuts
  • 1 teaspoon ground cinnamon
  • 1/2 teaspoon ground ginger
  • 1/2 teaspoon ground nutmeg
  • 1 teaspoon baking powder
  • 1/2 teaspoon sea salt
  • 1 cup shredded carrots (about 2 large carrots)
  • 1/4 cup coconut oil or butter, melted
  • 1/2 cup unsweetened apple sauce
  • 1 teaspoon vanilla extract
  • 1/4 cup maple syrup
  • 1/2 cup raisins

Instructions

  1. Preheat oven to 375°F.
  2. In a large bowl, combine all of the dry ingredients; oats, oat flour, walnuts, baking powder, salt, cinnamon, ginger and nutmeg.
  3. Peel and shred carrots to create 1 cup of well packed shredded carrots, typically 2 large carrots or 3-4 small carrots. Set aside.
  4. In a separate small bowl, combine the wet ingredients (except maple syrup); melted coconut oil or butter, vanilla extract and apple sauce. Whisk well to combine.
  5. Add the carrots to the dry ingredients, stir to combine, then add the mixture of wet ingredients, and stir until everything is well incorporated.
  6. Once the well mixed, drizzle in the maple syrup to help bind the dough and make it slightly sticky.
  7. Add in the dried raisins and stir to ensure they are well incorporated.
  8. Use a 1/2 cup measuring cup to shape the cookies into large burger-like patties. You want the breakfast cookies to be big, there should be enough batter to create 6 large cookies.
  9. Add cookies to a baking sheet lined with parchment paper, and transfer to the oven to bake for 25 minutes.
  10. Once cooked, remove from the oven and allow to cool. The breakfast cookies can be eaten immediately, stored in a tight container for up to 4-5 days, or frozen for later use.
  11. Enjoy!

Notes

*Oat flour can be made by simply adding rolled oats to a food processor or blender and blending until a flour consistency if formed.

Nutrition

  • Serving Size: 1 cookie
  • Calories: 357 calories
  • Sugar: 4 grams
  • Fat: 24 grams
  • Carbohydrates: 29 grams
  • Fiber: 5 grams
  • Protein: 8 grams

Did you make this recipe?

Share a photo and tag us — we can’t wait to see what you’ve made!


Chickpea Chana Masala

Published on August 10, 2017 by Stephanie Kay

This Indian-inspired chickpea chana masala is a great one-pot meal that can be made with simple pantry staples so you don’t need to worry about running to the grocery store to help get dinner on the table.

Chickpea Chana Masala


Although I am a total advocate for shopping regularly and using fresh ingredients, there are a few pantry items that I consider staples as they can help you create a really quick, easy, and inexpensive meal in very little time. I do my best to always keep things like canned tomatoes, beans, lentils, rice and oatmeal in the pantry to use a base for simple meals, as well as spices, onions, and garlic to help add a little flavor in a pinch. (I can handle a simple meal, but a bland meal I cannot.) Once combined these simple ingredients can create easy stews, soups, and curries in little time for very little cost, much like this vegetarian chickpea chana masala.

The term chana masala literally translates as “mix-spiced small-chickpeas”, so I’m not really reinventing the wheel with the name of this dish! Chana masala is typically made with chickpeas, tomatoes, a blend of spices, and a key ingredient called amchoor, however, because amchoor is not easily found for everyone, I’ve made my own version without it to help keep this chickpea chana masala recipe extra simple. Chana Masala is often served with some type of bread but I think paired with some fluffy rice it makes a great weeknight meal.


Print

Chickpea Chana Masala

Chickpea Chana Masala

Author: Stephanie Kay

This vegetarian chickpea chana masala is made with simple pantry staples to create a healthy weeknight dinner ready in less than 30 minutes.

  • Author: Stephanie Kay
  • Prep Time: 5 minutes
  • Cook Time: 25 minutes
  • Total Time: 30 minutes
  • Yield: 4 servings
  • Category: Curry
  • Method: Stovetop
  • Cuisine: Indian
  • Diet: Vegetarian
Print Recipe
Pin Recipe

Ingredients

  • 1 tablespoon coconut oil
  • 1 yellow onion, finely diced
  • 5 garlic cloves, minced
  • 2″ piece of ginger, peeled and grated
  • 2 teaspoon ground coriander
  • 1 teaspoon ground turmeric
  • 1 teaspoon garam masala
  • 1 teaspoon ground cumin
  • 1 teaspoon ground chillies (or 1/2 teaspoon for less heat)
  • 1/2 teaspoon sea salt
  • 1 can (28oz) diced tomatoes
  • 2 cans (14oz) chickpeas, strained and rinsed
  • 1/2 lemon, juiced
  • To Serve: Basmati rice and fresh coriander

Instructions

  1. In a large pot on medium heat, warm the coconut oil.
  2. Once warm, add the onion, garlic, and ginger and sauté over a medium heat for about 3-4 minutes until translucent.
  3. Reduce the heat to low, add the coriander, turmeric, chillies, cumin, garam masala and sea salt and heat for another 1 minute until fragrant.
  4. Add the diced tomatoes to the pot and stir well to combine with the spice mixture. Add in the chickpeas and stir to combine with tomato mixture.
  5. Bring to a light boil and then reduce to a simmer for 20 minutes until sauce has reduced and thickened.
  6. Remove from the heat, stir in lemon juice, sprinkle with fresh coriander and serve.
  7. Enjoy!

Nutrition

  • Serving Size: 1 serving
  • Calories: 276 calories
  • Sugar: 5 grams
  • Fat: 8 grams
  • Carbohydrates: 43 grams
  • Fiber: 12 grams
  • Protein: 13 grams

Did you make this recipe?

Share a photo and tag us — we can’t wait to see what you’ve made!

Sweet Potato Peanut Noodles

Published on August 3, 2017 by Stephanie Kay

These pad Thai-inspired peanut sweet potato noodles are a vegetarian and gluten-free twist on a classic dish that can help add more veggies to your diet.

Sweet Potato Peanut Pad Thai

Ok, if we are being nitty-gritty about it, this recipe isn’t exactly a pad thai. I mean, it is certainly inspired by a pad thai, but I took a bit of a leap with the sauce ingredients. A traditional pad Thai sauce is more on the sweet side of things and I went more of the salty and savory route with this particular dish. As opposed to using the more traditional tamarind paste I opted to use salty peanut butter as the base of this recipe to give it a rich and creamy flavor, and as opposed to rice noodles I opted to use fun sweet potato noodles instead!

Although sweet potato noodles might look and sound fancy, they are super simple to prepare and cook. Very similar to zucchini noodles, they can be made by using a spiralizer, peeler, or julienne peeler,  in fact, sweet potato noodles have become so popular you can find them at many grocery stores in the produce section. (Shh, don’t tell anyone, but that’s actually where I bought mine.) So, if time permits make your noodles at home for this Sweet Potato Peanut Pad Thai, or when life gets busy, just buy them in the grocery store to help get dinner on the table in a hurry.

More Noodles Recipes:

  • Spicy Pork Noodles
  • Spicy Peanut Chicken Noodles
Print
Sweet Potato Peanut Pad Thai

Peanut Sweet Potato Noodles

Author: Stephanie Kay

These peanut sweet potato noodles are a vegetarian and gluten-free pad Thai-inspired recipe.

  • Author: Stephanie Kay
  • Prep Time: 15 minutes
  • Cook Time: 15 minutes
  • Total Time: 30 minutes
  • Yield: 4 servings
  • Category: Mains
  • Method: Stovetop
  • Cuisine: Thai
  • Diet: Vegetarian
Print Recipe
Pin Recipe

Ingredients

  • 2 large sweet potatoes, peeled and spiralized (or buy them pre-cut)
  • 1 red bell pepper, julienned
  • 1 cup bean sprouts
  • 2 green onions, diced
  • 2 cloves garlic, minced
  • 1/4 cup cilantro, roughly chopped
  • 1/2 cup peanuts, roughly chopped, to serve
  • Lime wedges, to serve
Sauce:
  • 1/3 cup peanut butter, almond butter or cashew butter
  • 2 tablespoon tamari or soy sauce
  • 1 tablespoon fresh lime juice
  • 1 clove garlic, minced
  • 1-inch fresh ginger, grated
  • 1 tablespoon honey
  • 1 teaspoon sesame oil
  • 1/2 teaspoon chilli flakes (optional)
  • 1/4 – 1/2 cup water
 

Instructions

  1. Begin by preparing the sauce. In a bowl, whisk together sauce ingredients and set aside. (Depending on the consistency of your peanut butter, your sauce might be thick. It is best to start with 1/4 cup water and add more if needed during the cooking process when you add it to the sweet potato noodles.)
  2. Peel the sweet potatoes, and create noodles by spiralizing them into long strands. If you don’t have a spiralizer tool you can also cut the sweet potatoes into really thin, long strips.
  3. In a skillet on medium-high heat, heat oil and then add in sliced bell pepper, bean sprouts, green onion, garlic and allow to cook 2-3 minutes until the bell peppers are tender but not mushy.
  4. Once the vegetables have softened, add sweet potato noodles and cook for 5-7 minutes, tossing occasionally, or until cooked through.
  5. While the noodles are cooking (with about 2-3 minutes remaining), add the sauce and stir well to combine. Check the sauce at this point, if you find it is too thick as it cooks with the noodles simply add a couple of tablespoons of water to help thin it out.
  6. Portion the pad thai to serve and top with chopped peanuts, fresh cilantro, and a lime wedge.
  7. Enjoy!

Nutrition

  • Serving Size: 1 serving
  • Calories: 342 calories
  • Sugar: 11 grams
  • Fat: 21 grams
  • Carbohydrates: 33 grams
  • Fiber: 5 grams
  • Protein: 11 grams

Did you make this recipe?

Share a photo and tag us — we can’t wait to see what you’ve made!


Blackened Salmon with Avocado Salsa

Published on August 3, 2017 by Stephanie Kay

Simple salmon seasoned with a Cajun spice blend creates this super quick and easy blackened salmon with avocado salsa to help get dinner on the table in 15 minutes or less.

Blackened Salmon with Avocado Salsa

If you’re looking for a quick and easy salmon recipe that is packed full of flavor, look no further than this blackened salmon. Covered in Cajun-inspired spices and paired with a cooling and creamy avocado salsa, this salmon recipe is a great dish for a busy weeknight.

Fish is a great protein to use for an easy dinner idea when you have little time because it cooks so quickly. Although not everyone loves the taste of fish, adding a simple spice blend or marinade can help make it more palatable and less “fishy” tasting. Different varieties of salmon vary in taste and texture, but they are all a great source of protein and healthy omega-3 essential fats. Because salmon only needs to be broiled or grilled for a few minutes on each side it keeps cooking time to a minimum, simply add a little flavor in the form of spices and you’re good to go.

Cajun spice blends are easily found at most grocery stores, but making your own is just as easy as buying them in bulk. With a few common and easily found spices, you can create a sweet, spicy, and smoky seasoning blend that works well on fish, poultry, and meat. For this blackened salmon recipe, I mixed together just enough of the spices to coat the fish, but you could easily double or triple the spice mixture and save it for later use.

More Healthy Salmon Recipes:

  • Honey Mustard Salmon
  • Spicy Salmon Roll Bowls
  • Slow-Roasted Salmon with Fresh Herbs
  • Pistachio Crusted Salmon
  • Honey Ginger Grilled Salmon
Print
Blackened Salmon with Avocado Salsa

Blackened Salmon with Avocado Salsa

Author: Stephanie Kay

Covered in Cajun spices and paired with a rich and creamy avocado salsa, this blackened salmon recipe is the perfect combination of flavours, while being quick and easy to make.

  • Author: Stephanie Kay
  • Prep Time: 10 minutes
  • Cook Time: 10 minutes
  • Total Time: 20 minutes
  • Yield: 4 fillets
  • Category: Mains
  • Method: Stovetop & Baked
Print Recipe
Pin Recipe

Ingredients

Salmon:

  • 4 salmon fillets, skin on
  • 2 tablespoon melted butter or olive oil
  • Olive oil, to drizzle

Cajun Spice Rub:

  • 1 teaspoon paprika
  • 1/2 teaspoon garlic powder
  • 1/2 teaspoon onion powder
  • 1/2 teaspoon chilli powder
  • 1/2 teaspoon dried thyme
  • 1/2 teaspoon dried oregano
  • 1/2 teaspoon sea salt
  • 1/4 teaspoon cayenne powder
  • 1/4 teaspoon black pepper

Avocado Salsa:

  • 1 avocado, peeled and diced
  • 1/2 English cucumber, peeled and diced
  • 1/4 small red onion, diced
  • 1 handful fresh cilantro
  • 1 lime, juiced

Instructions

  1. In a small bowl combine the spices; paprika, chilli powder, garlic, onion, thyme, oregano, salt, pepper and cayenne.
  2. Transfer the spice mixture to a plate, or a cutting board.
  3. Drizzle each salmon fillet with a very small amount of olive oil (about 1/4 tsp.) and rub it over each fillet with your hand.
  4. Transfer each salmon fillets to the plate and coat with the spice mixture one at a time, flesh side only.
  5. In a cast iron skillet at a medium-high heat, heat the cooking oil. Add salmon fillets skin side down and sear for 3 minutes until blackened. Flip and cook for another 3-5 minutes until salmon is cooked through.
  6. While the salmon is cooking, prepare the salsa. Add cubed cucumber, avocado, add red onion to a bowl and toss well to combine. Squeeze in lime juice and season with sea salt to taste, set aside.
  7. Serve salmon with fresh avocado salsa and rice.
  8. Enjoy!

Nutrition

  • Serving Size: 1 fillet
  • Calories: 392 calories
  • Sugar: 1 gram
  • Fat: 24 grams
  • Carbohydrates: 8 grams
  • Fiber: 5 grams
  • Protein: 40 grams

Did you make this recipe?

Share a photo and tag us — we can’t wait to see what you’ve made!


Mexican Street Corn Salad

Published on August 3, 2017 by Stephanie Kay

This grilled Mexican street corn salad, also known as elotes, is packed with smoky, spicy and tangy flavours and is the perfect way to use up all of that fresh summer corn.

Mexican Street Corn Salad


In the peak of summer, there is nothing quite as delicious as the crispy, crunchy and sweet taste of fresh corn! Whether it’s off the cob, in a salad, soup or stew, there are so many different (and delicious) ways to eat it, and this Mexican street corn salad just happens to be one of my favourites.

What is Mexican Street Corn Salad?

Mexican street corn salad, traditionally known as esquites, is an off the cob version of elotes. Elotes is a dish of Mexican grilled corn that is eaten of the cob, loaded with mayonnaise, spices, lime juice and lots of cheese. Esquites are the salad version of elotes and a delicious (and easier to eat) version of corn on the cob. When corn is in season this Mexican street corn salad is the perfect dish to bring to any summer BBQ or backyard feast as its rich, creamy and smoky flavour will please everyone’s taste buds.


Mexican Street Corn Salad


Corn is hands-down my favourite summer vegetable, so much so that I could probably eat 3 or 4 ears in one sitting. Loaded with butter and sea salt, it’s just so good! Although eating it right off the cob will always be my favourite way, it’s not for everyone and there are so many other ways to use this summer ingredient. Often considered a vegetable, corn is, in fact, a gluten-free grain, so it is an ideal source of complex carbohydrates that can provide energy for the day.

More Corn Recipes:

  • Avocado Corn Salad
  • Mexican Corn and Chicken Soup


Print

Mexican Street Corn Salad

Mexican Street Corn Salad

Author: Stephanie Kay

This Mexican street corn salad recipe calls for fresh corn on the cob, however, you could also use frozen corn kernels and cook them in a pan with butter to create a grilled effect.

  • Author: Stephanie Kay
  • Prep Time: 10 minutes
  • Cook Time: 15 minutes
  • Total Time: 25 minutes
  • Yield: 6 servings
  • Category: Salad
  • Method: Grilled
  • Cuisine: Gluten-Free
Print Recipe
Pin Recipe

Ingredients

Corn Salad:

  • 5 ears sweet corn (about 4 cups)
  • 1 tablespoon melted butter or olive oil
  • 2 scallions, finely sliced
  • 1/2 cup fresh cilantro, coarsely chopped
  • 1 jalapeño, seeded and finely minced (optional)
  • 1/4 cup Cotija cheese, crumbled (or Feta or Parmesan)

Dressing:

  • 3 tablespoons mayonnaise
  • 1 lime, juiced
  • 1 clove garlic, minced
  • 1/2 teaspoon cumin
  • 1/2 teaspoon smoked paprika
  • 1/4 teaspoon black pepper
  • 1/4 teaspoon sea salt

Instructions

  1. Preheat a grill to medium-high heat.
  2. Begin by preparing the corn. Shuck the corn and remove as much of the silk as possible. (If any remains it is not a problem, they will burn off on the grill.)
  3. Coat each ear of corn with melted butter or oil, and place them on the grill. Cook for 10-12 minutes, rotating the ears every 2-3 minutes to ensure they do not burn. You want to create char marks on all sides, but do not want the entire cob to become entirely black.
  4. Once the corn is cooked, set aside and allow to cool slightly.
  5. While the corn is cooling, prepare the dressing. Whisk together homemade mayonnaise, lime juice, garlic, spices, salt and pepper.
  6. Once the corn is cool enough to handle,  stand the corn, picked-side down, on a cutting board, and use a sharp knife to slice down along the cob to remove the kernels. Discard the ears.
  7. In a large bowl, combine the corn kernels, scallions, jalapeño, cilantro, Cojita cheese, coat with dressing, and toss well to combine.
  8. Season with extra salt and pepper to taste, and top with extra cheese and cilantro to serve.
  9. Enjoy!

Nutrition

  • Serving Size: 1 serving
  • Calories: 200 calories
  • Sugar: 9 grams
  • Fat: 10 grams
  • Carbohydrates: 27 grams
  • Fiber: 3 grams
  • Protein: 6 grams

Did you make this recipe?

Share a photo and tag us — we can’t wait to see what you’ve made!

Vanilla Almond Granola

Published on July 26, 2017 by Stephanie Kay

This homemade vanilla almond granola is perfect for busy mornings or healthy on-the-go breakfasts!

Vanilla Almond Granola


When looking to make dietary changes, one of the first places I suggest people look is their breakfast. Unbeknownst to most people, the standard North American breakfast is very similar to dessert; loaded with added sugars and sweeteners, many standard breakfast items look more like slices of cake and scoops of ice cream given their sugar content than healthy breakfast options to fuel the day. Fortunately, making a healthy homemade breakfast is quite simple, and I think this vanilla almond granola is a great place to start.

If you are accustomed to pouring cereal out of a box or adding a slice of bread to a toaster every morning, making your own granola may seem complicated but I can assure you it is not difficult at all. In fact, it is one of the easiest recipes to make at home as it requires very little skill in the kitchen. If you are able to turn on an oven, and mix ingredients in a mixing bowl, this homemade vanilla almond granola will be no problem at all.


Vanilla Almond Granola


For this vanilla almond granola, I used sliced almonds, but you could also use almond slivers or roughly chop some whole almonds into bite-size pieces. For the best texture, be sure to use whole rolled oats, as quick cooking or instant oatmeal will not provide the same texture or consistency to the granola. For the best taste, be sure to use good-quality vanilla extract. If you don’t have maple syrup on hand, you could also sweeten your granola with honey.


Print

Vanilla Almond Granola

Vanilla Almond Granola

Author: Stephanie Kay

Made with rolled oats, vanilla extract and sliced almonds, this vanilla almond granola is equally healthy and delicious!

  • Author: Stephanie Kay
  • Prep Time: 10 minutes
  • Cook Time: 25 minutes
  • Total Time: 35 minutes
  • Yield: 8 servings
  • Category: Breakfast
  • Method: Baked
  • Cuisine: American
Print Recipe
Pin Recipe

Ingredients

  • 3 cups rolled oats
  • 1 cup flaked almonds
  • 1/2 teaspoon cinnamon
  • 1/2 teaspoon sea salt
  • 1/3 cup maple syrup
  • 1/4 cup coconut oil, melted
  • 3 teaspoon vanilla extract

Instructions

  1. Preheat oven to 350°F.
  2. In a large mixing bowl, combine all of the dry ingredients; oats, almonds, cinnamon and sea salt, and stir well to combine.
  3. In a separate small bowl, combine melted coconut oil, maple syrup and vanilla extract.
  4. Add the wet ingredients to the dry ingredients and use a wooden spoon or spatula to ensure they are well combined.
  5. Turn the granola mixture onto a baking sheet, spreading it out evenly.
  6. Transfer the baking sheet the oven for 25 minutes, stirring and turning halfway. Keep an eye on your granola to ensure that it does not burn, you want the granola toasted but not brown.
  7. Once toasted, remove the granola from the oven and allow to cool. Once cooled, store in a jar or airtight container at room temperature for up to 1 week.
  8. Enjoy!

Nutrition

  • Serving Size: 1/2 cup
  • Calories: 216 calories
  • Sugar: 1 gram
  • Fat: 9 grams
  • Carbohydrates: 24 grams
  • Fiber: 5 grams
  • Protein: 8 grams

Did you make this recipe?

Share a photo and tag us — we can’t wait to see what you’ve made!

  • Previous
  • 1
  • …
  • 42
  • 43
  • 44
  • 45
  • 46
  • …
  • 54
  • Next

Recipes

  • Dinner
  • Breakfast
  • Meal Prep
  • Snacks

Nutrition

  • FAQs
  • Tips
  • This vs. That
  • Weight Loss

Connect

  • Instagram
  • Youtube
  • About
  • Cookbooks

About Stephanie

I’m a nutritionist on a mission to change the way you look at food and teach you how to make real food work for real life in a realistic way.

Learn More

Site Credits
2023 © Stephanie Kay Nutrition | Privacy Policy
To Top